|
|
  Overview of Creating a Website
┬а
Step 1: ┬аPlan your website.
A website consists of one or more webpages, which can contain text, graphics, video, audio, and more. The number of webpages in your website depends on what you are going to use the website for. Do you want to share photos? Write a travel journal? Display a portfolio of your work? With iWeb, itтАЩs easy to modify, add, or remove webpages at any time, so you donтАЩt have to decide every detail before you begin. ItтАЩs also easy to create multiple websites so that you can, for example, have a personal website, a website for a .Mac group, and one for your business.
     COMMENTS(#1):
iWEB is application for creating "statical" sites. Site can be so beautiful, but need so expansive capacity like 4-10 Mb. (i)
┬а
Serge Moskalenko
Step 2: ┬аCreate your website.
In this step, you assemble and organize your website contentтАФwrite your text, add photos and other graphics, set up links to other websites, and so on.
┬а
Step 3: ┬аPublish your website on the Internet.
Your website isnтАЩt visible to the public until you publish it. With iWeb, this step is as easy as clicking a button.
Note: ┬аTo complete step 3 using the instructions in this tutorial, you need at least a trial .Mac membership and enough available iDisk storage space for your webpages, including your media (the movies, photos, and so on that you add to your website). If you donтАЩt have a .Mac account, you can sign up for one (a free 60-day trial or a paid yearly membership) by opening System Preferences and clicking .Mac (or by going to www.mac.com).
If youтАЩre not sure exactly what you want to put on your website (step 1), you can still go through the tutorial and learn how to use iWeb (step 2). Then, when youтАЩre ready to тАЬgo liveтАЭ with your website, you can publish it (step 3).
┬а
Create a Website
To get started, youтАЩll create a website that consists of one page (a welcome page).
To create a website:
If iWeb isnтАЩt open, double-click the iWeb application icon in your Applications folder. If iWeb is already open, and you donтАЩt see the template chooser shown below, click the Add Page (+) button at the bottom of the iWeb window (or choose File > New Page). In the template chooser that appears, click Freestyle on the left. In the thumbnails on the right, the Welcome template should already be selected for you (the selected template has a yellow border around it).
Click Choose.
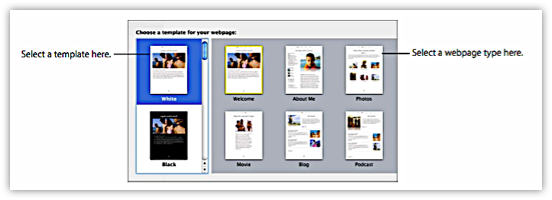 About Templates
Each time you add a new webpage, you select the pageтАЩs template. A template is a predesigned page with placeholders for text and graphics; you can easily replace the placeholders with your own text and graphics. iWeb provides templates designed for specific categories of webpages. For example, the Photos templates contain placeholders for photos and captions. By using the iWeb templates, you can create an attractive webpage without having to do any design work.
Your website can use as many or as few of the templates as you want, depending on the content you put on your site.
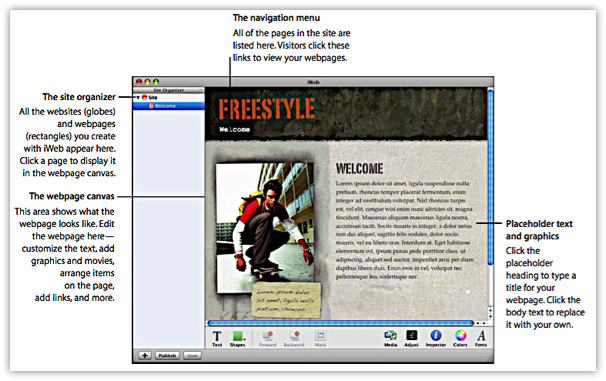
The Site Organizer
As you create websites and webpages, they appear in this list. Click the small triangles to show or hide pages in a site (or sub-pages in a blog). You can rearrange pages by dragging them in the list. You can even drag a page from one website to another.
┬а
The Webpage Canvas
The webpage canvas is where you create the content for a webpage. You can easily drag graphics files, movie files, and sound files to the canvas to add them to your website. The webpage canvas comprises four different regions. For more information, see тАЬMoving objects around on the webpage canvasтАЭ in iWeb Help.
┬а
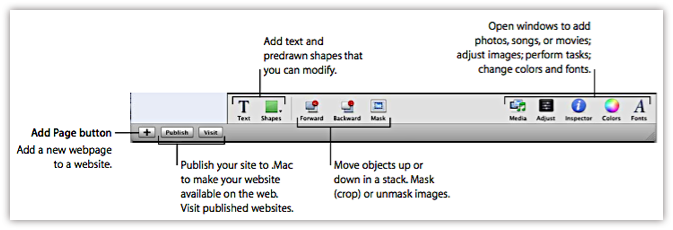
The iWeb Toolbar
The toolbar at the bottom of the iWeb window gives you one-click access to many of the actions youтАЩll perform as you create webpages.
┬а
┬а
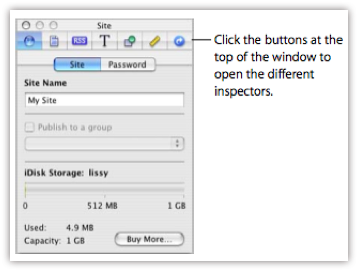
 The Inspector Window
The inspectors make it easy to perform many tasks in iWeb.
To open the Inspector window:
Click the Inspector button in the toolbar (or choose View > Show Inspector).
 Quitting and Reopening iWeb
When you quit iWeb, all of your webpages and websites are saved with the application. To work on your sites later, open the iWeb application; your sites and pages appear in the site organizer.
Closing the iWeb window (by choosing File > Close or clicking the red close button in the upper-left corner of the window) is the same as choosing iWeb > Quit iWeb.
┬а
Add Your Own Text and Graphics
Each template contains text boxes, with placeholder text, for different elements on the page. If you click the text, the entire text box is selected and selection handles appear. You can drag the text box to reposition it, and you can resize it by dragging a handle.
Experiment with adding your own text.
To replace placeholder text with your own text:
* Click the placeholder text and start typing. When you start typing, the placeholder text is replaced by what you type.
┬а
* Tip: ┬аChoose View > Show Layout to see all the text boxes.
Similar to placeholder text, graphics placeholders indicate the size and placement of graphics in a template. If you click one, selection handles appear so that you can resize the placeholder. You can drag your own image to the placeholder to replace it.
┬а
   COMMENTS(#2): ITтАЩS IMPORTANT! HINTS:
1. Write your plan on paper. Define main and additional blocks. What you want to display at first? May be, you want to publish your site by pages? For example, you can publish only page тАЬWelcomeтАЭ and blog page, where you can write about works on your site? ItтАЩs may be so interesting for many people, who want to publish personal sites also.
┬а
2. Before work with iWEB, collect your information in one file (or one folder). It can make your work more ease. Use copy-paste for insert text and pictures. ItтАЩs very useful
 ┬а┬а ┬а┬аcommand for paste with existing style. (i)
┬а
Serge Moskalenko
┬а
 COMMENTS(#3):
You can not save edited page as template! You must to select same template for insertion second same page! (i)
┬а
Serge Moskalenko
 COMMENTS(#4):
┬а
Serge Moskalenko
  |
|